JALBTCX/QRStep11: Difference between revisions
Created page with "{{DISPLAYTITLE:Quick Response Toolbox: Step 11 - Summarize Table}} thumb|right|alt=A screenshot of the ArcPro geoprocessing panel for Step 11. The "Change Table" input allows the user to select the file from a dropdown menu or the file explorer. The "Start Transect Number" and "End Transect Number" inputs require the user to enter a transect number in the text box.|Step 11: Summarize Table '''Summary:''' This step generates an ArcPro tool read ou..." |
mNo edit summary |
||
| (One intermediate revision by the same user not shown) | |||
| Line 1: | Line 1: | ||
{{DISPLAYTITLE:Quick Response Toolbox: Step 11 - Summarize Table}} | {{DISPLAYTITLE:Quick Response Toolbox: Step 11 - Summarize Table}} | ||
[[File:QR Step11.jpg|thumb|right|alt=A screenshot of the ArcPro geoprocessing panel for Step 11. The "Change Table" input allows the user to select the file from a dropdown menu or the file explorer. The "Start Transect Number" and "End Transect Number" inputs require the user to enter a transect number in the text box.|Step 11: Summarize Table]] | [[File:QR Step11.jpg|thumb|right|alt=A screenshot of the ArcPro geoprocessing panel for Step 11. The "Change Table" input allows the user to select the file from a dropdown menu or the file explorer. The "Start Transect Number" and "End Transect Number" inputs require the user to enter a transect number in the text box.|Step 11: Summarize Table|339x339px]] | ||
'''Summary:''' This step generates an ArcPro tool read out with a statistical summary of values in the change table between two user-defined transects created in the previous step. | '''Summary:''' This step generates an ArcPro tool read out with a statistical summary of values in the change table between two user-defined transects created in the previous step. | ||
'''Change Table:''' Change table created in Step 10 | '''Change Table:''' Change table created in [[JALBTCX/QRStep10|Step 10]] | ||
'''Start Transect Number:''' The transect number for the beginning of the group of transects the user wants to summarize. | '''Start Transect Number:''' The transect number for the beginning of the group of transects the user wants to summarize. | ||
| Line 15: | Line 15: | ||
This tool does not automatically output a file. The user must click on “View Details” link once the tool has completed. This will open a pop-up window with summary information that can be copied into a separate file for use in tables, slides, or notes. Figure 12, below, shows the output from Step 11 as it appears in ArcPro. | This tool does not automatically output a file. The user must click on “View Details” link once the tool has completed. This will open a pop-up window with summary information that can be copied into a separate file for use in tables, slides, or notes. Figure 12, below, shows the output from Step 11 as it appears in ArcPro. | ||
[[File:QRFigure12.jpg|thumb|alt=The output from Step 11 is an ArcPro text message that shows statistics within the transect range entered by the user. There are 3 main section of this information: Difference Volume, Difference Volume Above MHW, and Shoreline Change.|Figure 12: Screenshot of the pop-up output from Step 11 within ArcPro]] | [[File:QRFigure12.jpg|thumb|alt=The output from Step 11 is an ArcPro text message that shows statistics within the transect range entered by the user. There are 3 main section of this information: Difference Volume, Difference Volume Above MHW, and Shoreline Change.|Figure 12: Screenshot of the pop-up output from Step 11 within ArcPro|center|415x415px]] | ||
==Useful Links== | ==Useful Links== | ||
[[JALBTCX|JALBTCX Main Documentation Page]] | [[JALBTCX|JALBTCX Main Documentation Page]] | ||
[[JALBTCX/QRReferences|Refences: Quick Response Toolbox]] | [[JALBTCX/QRReferences|Refences: Quick Response Toolbox]] | ||
Latest revision as of 21:41, 11 December 2024

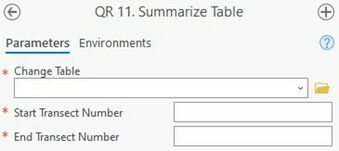
Summary: This step generates an ArcPro tool read out with a statistical summary of values in the change table between two user-defined transects created in the previous step.
Change Table: Change table created in Step 10
Start Transect Number: The transect number for the beginning of the group of transects the user wants to summarize.
End Transect Number: The transect number for the end of the group of transects the user wants to summarize.
Best Practices & Example Data:
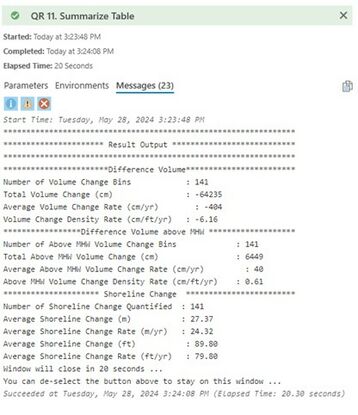
This tool does not automatically output a file. The user must click on “View Details” link once the tool has completed. This will open a pop-up window with summary information that can be copied into a separate file for use in tables, slides, or notes. Figure 12, below, shows the output from Step 11 as it appears in ArcPro.
