Quick Response Toolbox: Background
Background
The Quick Response Toolbox is an Python based toolbox for use in ESRI’s ArcGIS Pro software. Similar to the other tools that make up the JALBTCX Toolbox framework, it can be easily loaded into ArcGIS Pro via the “Add Toolbox” functionality in ArcGIS Pro as it is a self-contained “toolbox” file (file extension .tbx). The toolbox has gone through many version iterations as updates have been made and additional functionalities added. As of this report writing, the current version of the toolbox being used is version 4a and it is recommended to use ArcGIS Pro version 3.2 and above, although future versions of the toolbox will likely require the most recent version of ArcGIS Pro.
Users that are familiar with ArcGIS Pro geoprocessing should be able to easily leverage each step of the Quick Response Toolbox as the user interface is nearly identical and each step is considered a geoprocessing function. Additionally, steps in the toolbox leverage ArcGIS Pro file structures (e.g., geodatabases), file types (e.g., shapefiles), and behind-the-scenes geoprocessing tools whenever possible for further integration into ArcGIS Pro projects.
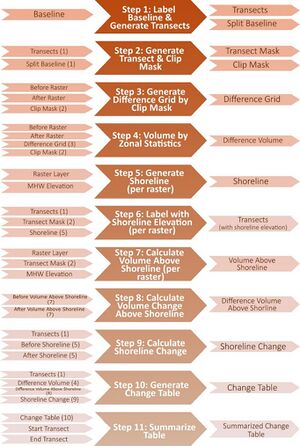
The toolbox steps are run in sequential order as each step in the toolbox builds off previous steps completed. This order is outlined in the workflow below. The steps can be run and re-run multiple times to iteratively assess and determine input parameters, or to process multiple datasets. Some steps of the Quick Response Toolbox will also run without needing prerequisite outputs from previous steps should the user choose to select processes based on desired outputs. The independence of steps allows for flexibility along the workflow path. Some steps are not required, for example, if a user was only looking to derive total volumes and shoreline change, they would skip Step 7: Calculate Volume Above Shoreline and Step 8: Calculate Volume Change Above Shoreline and proceed to Step 9: Calculate Shoreline Change. As the process is explained throughout the user's guide it will be made clear which outputs from previous steps are required as the user proceeds through the workflow.
Workflow Overview

The prerequisite step before beginning the Quick Response Toolbox is the creation of a baseline and transects. For calculating volume change baselines, mark the landward limit of the study area, or inland extent of volume computations, and typically follow the first line of infrastructure (houses, roads, etc.) along the coast. Baselines are typically digitized, manually, and output to a geodatabase feature class or a shapefile. Pre-existing baselines in a geodatabase or shapefile may also be used. Figure 1 is a graphic showing the baseline digitized seaward of infrastructure and dense vegetation.
The initial steps of the Quick Response Toolbox include the creation of mask polygon layers and raster differencing. Clip masks are generated based on the length of the baseline and transects to capture the whole study area or a segment. Transect masks are generated over volume change bins for analysis. To calculate volume change, raster math is used to subtract the “after” DEM raster from the “before” DEM raster and generate a difference grid. The difference grid is a raster whose cell values represent elevation differences with negative values indicating loss or erosion and positive values indicating gain or accretion. Once generated, zonal volume change and data statistics are calculated and appended to the Transect Mask layer as a field within the attribute table.
To bypass disparities in DEM raster extent and bathymetric coverage, the later steps of the Quick Response Toolbox allow the user to generate shorelines and constrain volume change results to the area between the shoreline and the baseline-defined landward limit. Shorelines are generated from user-defined mean high-water (MHW) values and the elevation is marked along each transect and corresponding bin for each year of analysis. Final volume change is recalculated as volume change above MHW and appended to the Transect Mask layer. Additionally, shoreline change between years of analysis can be calculated as a separate output.
User-defined parameters for the Quick Response Toolbox include a MHW value as well as the day, month and year of each DEM. A portion of steps, including mask and difference grid creation, zonal volume change and volume change above MHW are run once and include processing of both before and after DEM raster datasets. Shoreline generation and the addition of shoreline elevations to Transect Mask bins are run separately for each DEM raster dataset. Figure 1 displays the inputs and outputs to each step of the workflow and includes step number indicators to display where that file is created. For example, the Clip Mask leveraged in Step 3 includes (2), displaying it was created in Step 2.